If you hope to survive the zombie hordes and make it out of Raccoon City alive, you’ll need to be well equipped. Fortunately, Resident Evil 2 includes a vast arsenal of weapons that you can employ against the living dead. The trick, however, is getting your hands on these weapons. Oftentimes, it isn’t as straightforward as simply finding a gun and picking it up. Here’s our complete list of all weapons, their mods, and most importantly how to obtain them.
RE2: All weapons and how to find them
Matilda
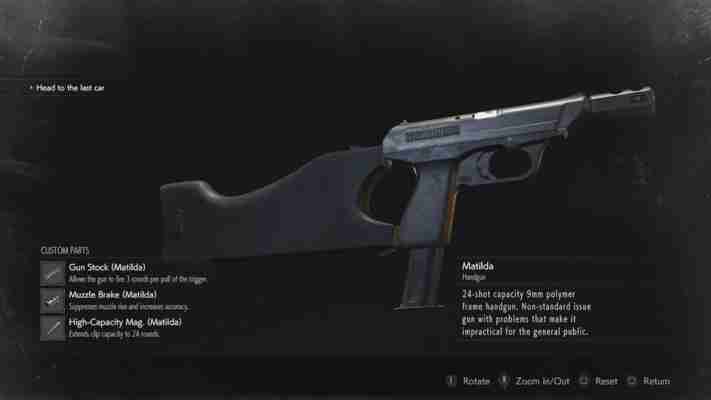
Location: Available in inventory from the start of the game (Leon).
Mods:
Description: Matilda is Leon’s standard starting handgun. A semi-automatic pistol with a decent magazine capacity to start, obtaining all upgrades will turn it into a slow-firing three-round burst weapon that’s much more accurate than the game’s submachine guns, but tends to chew through ammo fast. As Leon doesn’t have access to any alternate handguns in his standard scenario, you’ll want to hold onto this gun until the bitter end.
The Complete Resident Evil 2 Survival Guide
SLS-60
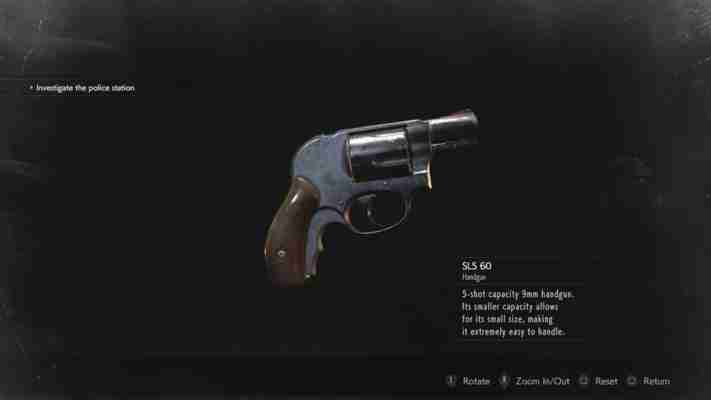
Location: Available in inventory from the start of the game (Claire).
Mods:
Description: The SLS-60 is a compact revolver that Claire keeps for self-protection. It only carries 5 shots of standard Handgun Ammo, and has a revolver’s standard lengthy reload. At its default state, this gun isn’t all that useful against the hordes. You’ll want to obtain this weapon’s upgrades as soon as possible. The Reinforced Frame, in particular, turns the gun into a Magnum type weapon that will come in handy during some of the late-game boss battles.
RE2: The 4th Survivor guide
JMB Hp3
Location: Inside the trunk of a police car in the parking garage. Use the car key found in the Firing Range to unlock (Claire).
Mods:
Description: This semi-auto handgun the standard issue sidearm of the Raccoon Police Department. It’s also a direct upgrade over the SLS-60, with better accuracy, increased capacity, and higher damage. As soon as you find it, you’ll want to start using this as your primary handgun, and use the SLS-60 as more of a backup weapon.
Lightning Hawk
Location: S.T.A.R.S. Office locker. Use S.T.A.R.S. badge to unlock (Leon).
Mods:
Description: This hand cannon is a staple component of Leon’s arsenal, but can also be easily missed if you haven’t found the S.T.A.R.S. badge. Examining the badge will reveal it to be a USB that can be used to open the weapons locker that it’s contained in, and the badge can also be used on a weapon case to grab the gun’s Long Barrel upgrade. You’ll want to make sure you grab it before heading down into the Sewer areas, as you’ll be able to put this weapon to good use against Tyrant or the mutated Dr. Birkin.
Quickdraw Army
Location: Guardroom, B1 (Claire Scenario B).
Mods: None.
Description: This old army revolver should be a familiar sight for any Red Dead Redemption 2 players. Only available in Claire’s B campaign, the Quickdraw Army fires powerful .45 Ammo. As this ammo is far more common in the B campaign than standard handgun ammo, you’ll likely be using the handgun as your primary sidearm. When holding down the trigger, Claire will fan the hammer and fire it almost like a submachine gun, but you’ll want to be careful as it only holds 6 shots and takes quite a while to reload.
M19 Handgun
Location: Guardroom, B1 (Leon Scenario B).
Mods: None.
Description: The M19 returns from Resident Evil 7 as Leon’s counterpart to the Quickdraw Army. When using the gun, Leon will hold it sideways, so you may find that you have to adjust your aim according. Also as with the Quickdraw Army, it has a low 7 round magazine, which means you’ll find yourself reloading a lot more often.
RE2: All lock and safe combos
MUP
Location: Hunk exclusive weapon (The Fourth Survivor).
Mods: None.
Description: The MUP is a German military handgun with a 16 round magazine. Unfortunately, this gun isn’t available in either of the game’s primary campaigns. You’ll only be able to use it when playing as Hunk during The Fourth Survivor minigame, where you’ll find the MUP in Hunk’s inventory by default.
Broom Hc
Location: Ada’s default weapon.
Mods: None.
Description: The enigmatic Ada Wong carries the Broom Hc as her personal handgun. As such, you’ll only be able to use it during a brief section in Leon’s campaigns where you get to take control of Ada. As far as the gun itself, it’s rather underpowered with a low capacity, and can’t be modified. It does well in the accuracy department, however, allowing for quick follow-up shots.
Samurai Edge (Standard Model)
Location: Unlocked with an S-rank clear (either campaign).
Mods: None.
Description: The Samurai Edge is the name given to the custom Beretta pistols carried by the RPDs elite S.T.A.R.S. unit. Each member of the unit could also further modify the pistols to better suit their specific needs. This standard issue Edge can only be unlocked by beating the game with an S rank. Befitting such a rare firearm, the Samurai Edge boasts infinite ammo, so fire away.
Samurai Edge (Jill Model)
Location: DLC weapon.
Mods: None.
Description: This version of the Samurai Edge has been further modified by Jill Valentine to allow for a faster draw. As a player, this means that you can quickly switch to Jill’s Edge from other weapons, making it effective as a backup gun.
Samurai Edge (Chris Model)
Location: DLC weapon.
Mods: None.
Description: Chris Redfield’s Samurai Edge has been further modified with a blued slide and silver match-grade trigger. This means the gun has increased accuracy, and will allow a quicker refocus on targets.
RE2: The 4th Survivor guide
Samurai Edge (Albert Model)
Location: DLC weapon.
Mods: None.
Description: This custom Samurai Edge was used by former S.T.A.R.S. commander and secret Umbrella operative Albert Wesker. It’s been heavily modified with some rather striking upgrades, including increased damage.
W-870 Shotgun
Location: Safety Deposit Room. Use Weapon Locker Key to unlock (Leon).
Mods:
Description: The shotgun can be found early in the campaign and serves as Leon’s main heavy weapon throughout the campaign. A well-placed headshot is capable of taking down a standard zombie in a single hit. It can be customized with several upgrades that give it a distinct advantage over its initial sawed-off form, at the expense of taking up more inventory space. Ammo can also be somewhat scarce, but can also be easily crafted using found Gunpowder items.
GM-79
Location: Safety Deposit Room. Use Weapon Locker Key to unlock (Claire).
Mods:
Description: Claire’s counterpart to Leon’s shotgun, the Grenade Launcher is a bit more unique. The grenade launcher is capable of firing two ammo types- flame and acid. Flame rounds tend to do a bit more damage while acid rounds do well to stumble and stun standard enemies. As a drawback, the launcher can only hold a single round at a time, but you can switch between ammo types with a quick button press as long as you have some of each type in your inventory.
MQ-11
Location: S.T.A.R.S. office locker. Use S.T.A.R.S. badge to unlock (Claire).
Mods:
Description: Though not particularly high damage, the MQ-11 excels with a blistering fire rate. You’ll want to fire in short bursts to preserve accuracy. You can also easily stagger an enemy with a few rapid shots to the legs, leaving an opening for you to slip past while also saving valuable ammo.
LE-5
Location: Complete the game with an S-rank on Hardcore difficulty.
Mods: None.
Description: The LE-5 is a standard-issue submachine gun used by Umbrella’s elite paramilitary unit. As such, Hunk is equipped with one during The Fourth Survivor. If you want to unlock the LE-5 for use in the main campaigns, you’ll need to clear either campaign on Hardcore with an S-rank. Like the Samurai Edge, it will come equipped with infinite ammo.
Spark Shot
Location: Supplies Storage Room, Sewers. Use King/Queen chess plugs to unlock (Claire).
Mods:
Description: The Spark Shot is an odd but powerful weapon. Essentially a gigantic taser, the Spark Shot launches electrical prongs at an enemy. Once embedded, the prongs will continue to electrocute the enemy as long as you keep the weapon aimed at them before finally exploding and dealing huge amounts of damage. This is especially effective against the G-Virus monsters that populate the Sewers.
Chemical Flamethrower
Location: Supplies Storage Room, Sewers. Use King/Queen chess plugs to unlock (Leon).
Mods:
Description: Nothing quite beats a classic flamethrower. Though powerful, it does have some drawbacks. The flames can take a while to deal damage, so you’ll want to keep enemies at a distance while in use. This gun is especially effective against the plant-based Ivy monsters in the Lab’s Greenhouse area. Charring them to a crisp is the only way to prevent them from reviving.
Minigun
Location: Turntable Lift, Laboratory (Claire).
Mods: None.
Description: The Minigun is a beast of a weapon that Claire can grab before her final boss fight. It comes with a huge ammo pool, but the fast fire rate means that ammo can disappear fast. In the B-Scenario especially, you’ll want to make sure you have some ammo saved for the “true” final boss in the train sequence.
Rocket Launcher
Location: Lift Room, Laboratory (Leon).
Mods: None.
Description: Like Claire’s minigun, the Rocket Launcher is only available in Leon’s last fight against the Super Tyrant. Last long enough, and a mysterious figure will eventually toss the weapon to you. Though it will only take a single shot to kill the Tyrant, it carries four shots. You can save the remaining three to do with as you please, or use against the final train boss in the B scenario.
More about Resident Evil
5 must-play Resident Evil games ►
Resident Evil 2: Everything we know so far ►
Resident Evil 2: Are the Collector’s Editions worth it? ►
10 most terrifying survival horror games ►


