Switching from iOS and Android doesn’t have to be a pain. Your music, contacts, calendars, and more can be transferred over to your new Android phone, but it’s not always clear exactly how to do it.
Google has its own guide on how to switch , but it requires users to sign up for its services like Google+ , Gmail and Play Music . If you don’t want to sign up for these accounts, there’s still ways to get your content to your new Android phone.
Here’s how
Transferring your contacts
Transferring your music
Transferring your photos
Disabling iMessage
Finding and managing your apps
Wrap-up
Transferring your contacts
Transferring your contacts can either be as simple as signing in, or a mess of complicated steps. Gmail users can sync their contacts by simply signing into their account when setting up a new Android device.
If you store your contacts in Apple’s iCloud or anywhere else, there’s quite a few additional steps you need to go through.
The first thing you should do before moving any contacts is to check which contacts account you have set by default on your iPhone. You can check this by going to Settings and then tapping on Mail > Contacts > Calendars . In this section, find Contacts, and look for the section called Default Account .
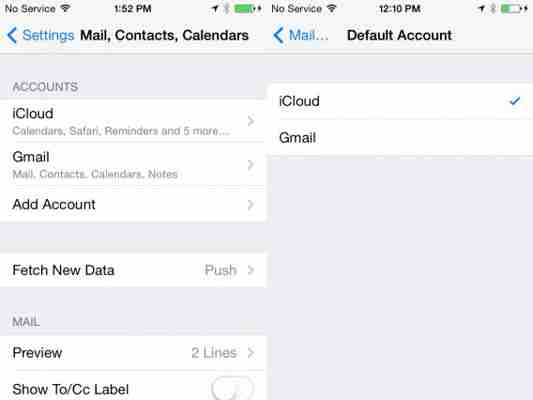
Transferring contacts from iCloud
To move your iCloud contacts to your Android device, you’ll need to export and upload them to Gmail. Here’s how you do it:
1. On your iOS device, go to Settings and navigate to Mail > Contacts > Calendars .
Tap on iCloud and make sure the toggle for Contacts is switched on. This will ensure that your contacts are synced with iCloud.
2. On your computer, navigate to iCloud.com and log in with your Apple ID.
3. Click on Contacts and then the settings icon (gear) in the lower left hand of the screen. Click Select All .
4. Hit the settings icon again and tap on Export vCard .
5. Open Gmail.com in your browser and click the Mail button at the top left, which exposes the Contacts section.
6. Click on More to expose the drop-down menu and then click Import . Find the vCard you downloaded from iCloud and import it into Gmail.
7. Hit More again to see the Find & Merge duplicates option. This will clean up your contacts before you sync them over.
8. Log into your Gmail account on your Android device and all your accounts will be synced automatically.
Transferring contacts stored on your iPhone
If you don’t store your contacts in either Gmail or iCloud, you’ll have to sync with iTunes to get them off your device. Here are the steps:
1. Connect your iOS device to your computer and open iTunes.
2. Click on your device in iTunes and navigate to the Info tab. Click on the Sync Contacts with button.
3. Choose Google Contacts from the drop-down menu and log in with your Gmail username and password.
4. Wait for the syncing to complete.
Importing contacts stored on your SIM card
If you’re old school and have your contacts stored on your SIM card, you can import them easily from the People app on Android.
1. Open the People app and tap the menu button (three dots).
2. Tap Import/export and then Import from SIM card .
3. You can then import contacts individually or tap on the menu button again and select Import All .
Transferring your music
Google’s way is the easiest
iOS requires iPhone, iPad and iPod touch users to use iTunes to manage their music. Android provides more flexibility and isn’t tied to one desktop application. In fact, Google doesn’t have a desktop music app at all. Instead, Google wants you to upload all your songs into its cloud so that you can access them anywhere.
Google Play Music is a great service and app, which can hold up to 20,000 of your songs . If you have a lot of songs, it can take a while to upload all of them.
There’s also a $10/month music subscription service like Spotify that gets you access to Google’s entire music library.
Even if you don’t pay for a subscription, Play Music is the easiest way for most people to transfer their music onto their Android device. Here’s how to set it up:
1. Make sure your all your music is synced with iTunes by plugging in your iPhone, iPad or iPod touch.
2. Once all the music is backed up onto your computer, install the Google Play Music Manager ( download here ) and the app will upload your entire iTunes library into the cloud.
3. Finish setting up Play Music by creating a Google Wallet account. You’ll need to give Google a credit card number to create a Wallet Account.
That last step may have users worried. Although Play Music is free, Google requires you to input a credit card number to Google Wallet .
Google requires a credit card because it must verify your country of origin to comply with country-specific copyright laws. It also doesn’t hurt that Google has your credit card number ready for when you upgrade to Play Music.
If you don’t want to give Google your credit card number, check out an alternative way listed below.
Avoiding Google Play Music
The great thing about Android is that it isn’t tied to a desktop app like iTunes. If you do want to use a desktop app, check out doubleTwist , which is available for PC , Mac and Android . It acts like iTunes for Android and even lets you wirelessly sync your music over your home Wi-Fi network.
doubleTwist will import your entire iTunes library, making it easy to move your music to your new Android device. In my testing, I found doubleTwist to be a bit buggy and messy on both Mac and PC.
Users who don’t want to use a desktop music app at all can simply drag and drop music files and folders onto an Android device. Here’s how:
PC
1. Plug in your Android device to your PC or Mac. You may need to wait for a driver to download and install before your device shows up.
2. Pull down the notification shade and look for the USB symbol. Tap on the notification and you’ll be taken to USB options.
3. You have two options in the menu: Media device (MTP) and Camera (PTP) . Select Media device and your Android will mount as a drive.
4. Navigate to the “Music” folder. Create a Music folder if there isn’t one already.
5. Locate your music files and drag the ones you want onto your Android device.
Mac
1. Install Android File Transfer .
2. On your Android device, pull down the notification shade and look for the USB symbol. Tap on the notification and you’ll be taken to USB options.
3. You have two options in the menu: Media device (MTP) and Camera (PTP) . Select Media device.
4. Locate your music on your computer and drag it into the “Music” folder on your Android phone or tablet using Android File Transfer. If there’s no “Music” folder, create one.
iTunes stores music in its own database so it may be difficult to find some albums. To make it a little easier, you can browse for music in iTunes, right-click on an album and click Show in Windows Explorer ( Show in Finder on a Mac). This will bring you to the location of the music files for you to drag and drop.
Transferring your photos
The easiest way: sign up for Google+
Google’s apps and service win again when it comes to simplicity. If you want to move your photos quickly, you can sign up for Google+ and upload them to the cloud. All your photos will show up in the Google+ Photos app (part of Google+) on your new Android device without having to download anything. Here’s how transfer your photos using Google+:
1. Download Google+ on your iPhone or iPad.
2. Open the app and sign in using your Google account (your Gmail login works).
3. Go to the app’s settings and enable “Auto Backup” under Camera and Photos .
4. Wait for your photos to be uploaded to Google+. Don’t worry, they’re in a private folder that no one can see.
5. Open the Photos apps on your Android device and all your photos will be available. You can view them in the cloud or choose to download them for offline viewing.
Alternative app: Dropbox
If you don’t want to sign up for Google+ and already have a Dropbox account, you can upload your photos there. Here’s how to do it:
1. Download Dropbox on your iOS device.
2. Head to settings and look for Camera Upload .
3. Enable Camera Upload by tapping on the slider.
4. Wait for Dropbox to upload all your photos to the cloud.
Transferring photos without the cloud
If you don’t want to store your photos in the cloud at all ( which isn’t a bad idea ), then you’ll have to do it the old fashioned way. Both Android and iOS devices can be mounted as a camera drive. You can then drag and drop photos to your computer or directly onto the new device. Here’s how to set it up:
Mac :
1. If you have iPhoto installed, the app will ask you to import your iPhone or iPad photos into the app.
2. Select the photos you want or select them all and import them.
3. In iPhoto, export the photos you want to transfer to your Android to a folder on your desktop.
4. Plug in your Android device and open up Android File Transfer .
5. Drag and drop the photos anywhere on your Android device. You can make a folder called “Photos” if there isn’t one already.
PC :
1. Plug in your iOS device. It should mount as a camera. If you have a password on your device, you have to enter it before it shows your photos.
2. Plug in your Android device. On your Android, pull down the notification shade and tap Touch for other USB options .
3. Select Camera (PTP) to mount your Android device as a camera.
4. Transfer your photos by dragging and dropping between the devices.
Disabling iMessage
One thing iPhone users always forget to do before switching to a non-Apple device is to disable iMessage. If you don’t, your text messages will be sent to your iOS device and will never appear on your Android phone.
To do this, head over to your iPhone’s settings app and look for Messages . Then slide the iMessage option to the off position. Now your text messages should arrive on your Android device without a problem.
UPDATE : Apple finally released an official way to disable iMessage after you switch phones. If you don’t have your iPhone any more, this tool will help you disable iMessage and make sure you get all text messages in the future.
Finding and managing your apps
Now that you moved your contacts, photos and music to your new Android phone or tablet, it’s time to find all your apps. Unlike iOS which relies on iTunes to download and manage apps, Android handles installing apps through the Google Play website.
You can click on the Apps section and search for apps to install on your device. Click Install on an app page and your app will be sent to your phone automatically. Of course, you can look up apps on your Android phone or tablet but doing it on the web is much quicker.
While you’re downloading your apps, be sure to install an antivirus as well. Android is more open than iOS, giving users the option to install apps outside Google Play. Although most users won’t enable this feature, it doesn’t hurt to protect yourself with an antivirus.
Also set up Android Device Manager in case your Android phone or tablet gets lost or stolen.
Wrap-up
Now that you’ve moved all your stuff to your new Android device, it’s time to familiarize yourself with the operating system. Check out everything you need to know about Android 5.0 Lollipop , the latest version of Android.
While the default Android camera app is good, there are better alternatives . You can download a photo editor too to make your pictures pop.
Check out our Softonic homepage for more Android news, how to’s and reviews.


