
Building a Gaming PC for the First Time? This Guide Can Help.
Before you build a PC, you’re obviously going to need the right parts. That’s why we’re here.
Picking the right components for the build you need can be a daunting process at first, but once you dive in, you’ll see that it’s not only surprisingly simple, it’s a heck of a lot of fun. This guide is by no means meant to be exhaustive, it’s more a primer on what you’ll need to know to gather up the right parts, and start putting your dream build together.
We’ll mostly be focused on building a gaming PC here, but this guide should cover the basics for everything from a high-end work rig for professional applications to a simple media computer.
And if you’d rather buy a pre-built, rather than building your own, we have a guide for that too.
Alright, let’s get to it!
What Do You Need to Build a PC?
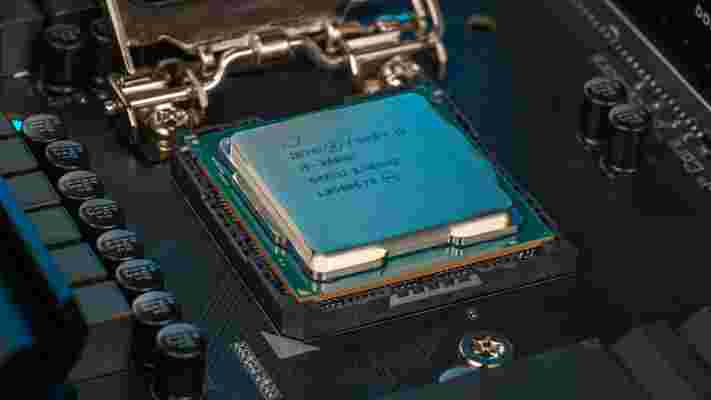
The processor, or Central Processing Unit, is the brain of the PC. It’s what converts the instructions you provide into actions the computer can execute, and tells all the other parts of your build how to work together. If the CPU is the brain, the rest of the system is the body.
The CPU is probably the single most important component for any computer, and as you’d expect there are almost endless options at a variety of price ranges. The two primary manufacturers in the consumer PC space are Intel and AMD, and even within those brands, there are plenty of choices. For AMD you’ll most likely be looking at a third generation Ryzen, or Threadripper if you want high-end. Intel’s Core i designated CPUs are all solid choices, though you’ll probably want to consider a 12th Gen i5 or i7 if you’re looking to put together a serious gaming or streaming rig. If that isn’t enough oomph for you, then maybe a Core i9 is more your thing.
The motherboard is essentially a large circuit board that connects all the components that make up your PC, and allows communication between all the different hardware. As with anything in PC building, there are options galore, from simple motherboards at the lower-end of the price spectrum all the way up to feature-rich boards with all sorts of bells and whistles.
The type of motherboard you need will largely depend on what CPU you purchased and what features you’re interested in. Not every CPU works with every motherboard, so you’ll want to make sure you get the right one. Features like CPU overclocking capabilities, lighting, and connectivity options are all factors to keep in mind when purchasing a motherboard.
Check out this full breakdown on how to choose a motherboard for all the info you’ll need to make an informed decision.
The Graphics Processing Unit (GPU) will have the most impact on your gaming experience. The GPU is essentially what allows your computer to do the complex graphics calculations that allow your PC games to look so good. Though many CPUs have integrated graphics, a GPU is absolutely required if you want to have a modern PC gaming experience.
The two biggest players in the world of graphics cards are AMD and Nvidia. Depending on how much you want to invest, you can go with something on the lower-end of modern GPUs, like the GeForce RTX 3050 from Nvidia, or the Radeon RX 6500 from AMD. If you want a cutting-edge experience, Nvidia’s RTX 3090 Ti is the current king of consumer facing GPUs, with the Radeon RX 6900 XT from AMD not far behind.
If you’re looking for the best gaming experience, the GPU might be the priciest component you’ll buy, but you’re not going to want to skimp here, especially if you’re looking to get into gaming at higher resolutions and frame rates.
To learn more about what card will work best for your needs, check out our guide on how to choose a graphics card.
Random Access Memory (RAM) is essentially your PC’s short-term memory. It keeps data you use regularly easily accessible, so your PC doesn’t have to access a storage device every time you need to use that data. It’s different from your primary storage devices in that RAM resets when it doesn’t have power, which is why you still need larger storage drives for long term data storage.
When it comes to RAM, the more the merrier. You can’t really have too much RAM, but for practical purposes, most gaming systems will be fine with 16GB, or 32GB if you want to keep your PC viable for several years.
RAM varies widely in speed, size, and design, so check out our RAM guide for answers to any questions you might have when it comes to memory.
Storage is where your data is…well, stored, so your PC can access it. This includes files, games, your operating system, any data that you need to access will be kept on a storage drive. In the past, storage mostly consisted of hard disk drives (HDD), but now solid state drives (SSD) are more widely available. SSDs are significantly faster, quieter, and more durable, but also cost more per gigabyte.
The right storage solution will vary, though a common configuration is a smaller NVMe or SATA SSD for your operating system and most commonly used files, and a larger HDD for your larger files. You can also rely on external storage solutions, which have the advantage of being portable.
The Samsung 980 Pro M.2 SSD is one of the most popular solid state solutions, and the 3TB Seagate BarraCuda HDD will work great for larger installations and file storage.
If you want to learn more about all the different types of storage, check out our guide on choosing the right storage.
This is where all of your precious parts are going to live, and what most people think of when they imagine a PC. Cases are one of the most customizable parts of a PC, so you can get cases in just about every shape and size you can imagine. Though every case is different, they are all designed for roughly the same components, meaning they share similarities across brands and layouts. There’s always going to be a place to install the motherboard and power supply, for example, though the configurations of where everything is located may vary.
Unless you’re looking to build something small, or with advanced features like custom cooling loops, most cases will work just fine. Just find one that’s the right size, and looks the way you want it to, and you should be good to go.
Another important feature to consider when it comes to cases is cooling. Many cases will come with fans already installed, which can be useful, but if low temperatures are important to you, you’ll want to make sure there’s room for the cooling solution you need. A simple rule of thumb is that if you’re wanting to do a lot of custom work, the bigger the case, the better.
If you’re looking for a unique open air design, check out the Thermaltake P5. If you want lighting options, take a look at the Carbide Spec-Omega RGB from Corsair. For something simple, attractive, and reliable, keep the Rosewill Cullinan in mind. Or if you plan to go the custom watercooling route in the future, you can’t go wrong with the Lian Li O11 Dynamic.
As you probably guessed by the name, the Power Supply Unit (PSU) provides the power that allows your build to function. The PSU is often overlooked, because if you have a relatively simple build, any power supply will usually work. That said, it’s absolutely worth doing your research on efficiencies, wattage, and quality, especially if you’re putting together a more complex system. If you are using high-end video cards (or multiple video cards) or a custom cooling loop, you’ll definitely want to make sure you have a PSU with enough wattage.
A good reference is this power supply calculator, which allows you to see what kind of power requirements you’ll need based on your system.
If you’re looking for a beefy PSU for a super fancy system, you can go to the high-end of the spectrum like the Seasonic PRIME GS-1000 1000w If something simpler is more in line with what you need, the Rosewill HIVE 550S 550w power supply might be a good fit.
Your CPU works incredibly hard, and that creates heat.
Keeping your CPU cool is critical to your system running properly, and though many CPUs come with a cooler, often times you’ll want something a little more powerful. These options can range from simple fans and heatsinks to elaborate liquid cooling solutions. For your first build, you’ll probably want either a fan based solution, or an All In One (AIO) liquid CPU cooler if you’re planning on overclocking your CPU. The process of installing these cooling solutions varies from product to product, but usually involve attaching it to your motherboard, and using thermal paste to make sure heat is dissipated properly from your CPU.
It sounds complicated, but it’s really not. Even the AIO liquid coolers are self-contained, and you don’t ever have to actually deal with the liquid inside. Simply make sure the cooler is compatible with your CPU and motherboard, and that you have enough room in your case. The rest is just a matter of following the included instructions.
One of the most popular entry-level air coolers is the Noctua NH-L9x65, perfect if you want a reasonably priced silent fan from one of the best PC cooling manufacturers on the planet. If you’re looking to get into AIO liquid coolers, check out the NZXT Kraken X73. Not only is it a great CPU cooler, it has some awesome lighting options as well.
Now that you’ve picked out the parts for your build, it’s time to talk about everything else you’ll need for a quality gaming experience. Let’s start with a monitor. After all, a sweet gaming PC isn’t much good if you can’t see anything.
You can go with a simple, entry-level 1920×1080 monitor or TV if you want, but part of the fun of PC gaming is that you have more options. If you invested in a good system thus far, you might want to move up to higher resolutions, like 2540×1440, or even 3840×2160 (4K) for truly crystal clear images. You can also upgrade to a higher refresh rate like 144Hz or even 240Hz, which will make everything look significantly smoother. Depending on your GPU, you may want to invest in a monitor that supports either Nvidia’s G-Sync or AMD’s Freesync, as this will reduce screen tearing and further improve your gameplay experience.
All of these factors, including others like display size or aspect ratio, are going to increase cost. That said, there’s not much point in having a powerful PC if what you’re seeing doesn’t look great, so it’s probably worth the investment. For gaming however, it’s primarily about choosing a monitor with low input lag and fast pixel response times.
If you’re looking for a moderately priced entry-level gaming monitor, the curved Acer ED242QR has Freesync and a 144Hz refresh rate, a perfect match for an entry level to mid-range GPU. If you want to go super high-end, the Alienware 34 has just about everything you need for a luxurious gaming experience.
A mouse is just a mouse right?
Nope. Like everything else we’ve been talking about, you can get a mouse that perfectly matches your style. If you’re a gamer, having mappable buttons might be important to you, as well as being able to adjust the DPI (essentially the speed of the cursor) on the fly. Maybe you want a wireless mouse, or an outside-the-box design.
The most important thing is probably comfort, so make sure you find a mouse that feels right. One of the most popular gaming mice (for good reason) is the Logitech G502 Hero, but there are lots of great mice out there from companies like Corsair, Razer, and plenty of others.
Check out our breakdown on how to find the right mouse for more info.
Even with something as seemingly straightforward as a keyboard, there are a ton of options. Do you want the traditional feel of a membrane keyboard, or the precise tactile feedback of mechanical switches? Do you want wired or wireless? Do you need macro keys? How important is RGB lighting?
There’s a lot of great keyboards out there, so you can find exactly what works for you. One of the most popular mechanical keyboards is the Corsair K70 LUX. The Razer Huntsman Tournament Edition is a great entry-level mechanical board with Razer optical switches.
The best way to learn your own preference is by testing different keyboards, but this guide on how to choose the right keyboard is also a great place to start.
The Operating System (OS) is the software that allows you to interact with your computer. Once it’s installed on your storage device (preferably a SSD,) you can then start installing all of your programs, games, and whatever else you’re going to use your computer for.
There are several operating systems to choose from, but by far the most popular for the average person is Microsoft Windows 11, due to its widespread use and straightforward user experience. While many still stick with Windows 10, it’s only a matter of time until Windows 11 eclipses its predecessor.
Linux is also popular, and has the added advantage of being free, though it also has a bit more of a learning curve.
Putting Together Your PC
Once you have everything ready to go, it’s time to actually start building.
This is the part that many people find intimidating, but once you get started, you’ll see that these components are designed to be put together easily. As long as you’ve done your research and know everything is compatible, it really is like putting together a fancy Lego kit.
This video will walk you through the entire process:
Here are few more tips to keep in mind while you get started.
Installing Memory (RAM)
Memory is one of the more straightforward components to install. Start by pushing open the two tabs on either side of the RAM slot on the motherboard slot. Look to the memory guide to check that you’re installing with the right orientation. Once the RAM module is lined up with the slot, simply push down until you hear a click, then make sure the tabs are closed. Repeat those steps for any additional memory.
Depending on your case, it might be easier to do this before you install the motherboard into the case.
Installing the CPU
Most CPUs today don’t have pins, as the connector pins are usually located on the motherboard. This is great, because damaging the expensive CPU is much worse than the (usually) cheaper motherboard.
The process may vary slightly depending on the CPU and motherboard, but usually installation follows a similar pattern.
Start by unlocking the CPU bar. Then, open the CPU door, place the CPU in the right direction, (arrows marked on both will help you line it up), close the door, and lock the bar down. Mounting the heatsink is also dependent of your hardware, but it generally connects through the four holes closest to the CPU socket. Usually this is done through screws or locking/twisting plastic pins. Remember to use a sensible portion of thermal paste when mounting the heatsink; an amount roughly the size of a pea is a good reference.
Also, be sure to plug the CPU cooler into the motherboard so it will have the power it needs to function. The exact process should be clearly articulated in the instructions that come with your cooler.
Again, installing the CPU and CPU cooler is best done before the motherboard is placed in the case to keep things as simple as possible.
Preparing Your Case
The first step to getting your motherboard in your case is installing standoffs. Standoffs are small brass spacers that match up with the screw holes on your motherboard, and work to keep the metal on the motherboard from touching the metal in your case. Make sure to install them where screw holes are present in the case, and consult your case manual if it isn’t obvious where these holes are.
Your motherboard will come with a cover called an I/O shield. This cover should be placed over all the external connections that are visible from the outside of the case. Make sure you line it up properly and snap it on. It’s easy to forget this step, and it can be a pain to go back to install it, so do your best to remember the first time.
Installing the Motherboard
Remember, your motherboard is essentially a huge circuit board, which means it’s delicate.
It’s important to be careful as you line up the holes and add screws to all of the standoffs you placed inside your case. You want the motherboard to be secure and not loose, but you also don’t want to over-tighten the screws. If the board is bending at all, you’ve over-tightened.
You may need to push the motherboard slightly back towards the expansion slot cover before screwing it in, but as long as you line up all the screws, you should be good to go.
Install Everything Else
Once your motherboard is mounted, everything else is fairly straightforward. Use the video we shared above for more detail.
The GPU will live in the PCIe slot. Make sure you remove any expansion coverings, and be sure it clicks into place properly and is secured with screws once installed.
If you have an M.2 drive, carefully install it into the appropriate slot on your motherboard, and use the small screw to keep it secure. Again, do not over-tighten.
A good rule when installing components is to use a bit of force, but if you feel like something isn’t fitting, it’s good to double check that it’s in the correct place. This stuff is designed to fit together, so you shouldn’t have to push too hard.
Your video card, storage devices, and motherboard will all need power from the power supply.
The proper cables should be included with your PSU. If not, use the adapter provided with the video card box. Your hard drive or SSD will also need a power cable, as well as a SATA or data cable, unless you’re using an M.2 as described above. All of these cables should be included with your devices.
The right cable to use from the power supply to the components that need that power should be fairly obvious. Simply match the plug to the connection the component needs, and check any manuals if it isn’t super clear.
Installing fans will vary on your cooling setup, but again, it should be fairly clear what goes where. Simply match the cable to the input on your motherboard, and check your manual if you run into any issues.
Fire It Up
Once everything is wired up and looks the way you want it to, it’s time to plug in the power supply, hit that power button, and turn on your new computer. If everything is connected properly, you should see your motherboard’s BIOS screen.
The final step is to install your operating system of choice, and start using your new PC!
Error Messages
If everything didn’t come together on your first try, don’t panic, this happens to the best of us. It’s almost always an easy fix.
Luckily, your computer will often tell you what is wrong, whether in the BIOS menu, or via an error message from your motherboard. This is where research comes in handy, as any error you’re running into will be something someone else has probably encountered and resolved as well.
We put together a handy guide to five common PC problems and how to fix them, so take a look at that before you spend too much time researching.
Congratulations!
Whether this is your first PC, or your fiftieth, congrats on taking the time to learn how to put a PC together. There’s always more to learn, but if you’ve come this far, you’re well on your way to becoming a DIY master.
Have fun, and happy PC gaming!
How to Setup and Configure a New Windows 10 PC
How-To How to Setup and Configure a New Windows 10 PC By

Performing a clean install of Windows 10? Check out what’s new in the out of box experience (OOBE).
Each revision of Windows 10 rearranges the furniture a bit, for better or worse. If you purchase a new PC with the Windows 10 Creators Update preinstalled or perform a new install, you will be greeted by a revised Out of Box Experience. The Out of Box Experience or OOBE is the first-run experience that has you perform many tasks before using your computer. As part of the OOBE, you’ll choose your account, connect to a wireless network (if one is available), choose a language, and adjust your privacy settings.
The new OOBE is more than a cosmetic update. For one, as we covered earlier, users can modify their Windows privacy options in more detail. Microsoft has made the process more transparent for users who want more control over the information they share with the developers. There are some other changes as well. In this article, we’ll walk through the new setup experience and explain each step.
How to Configure Your Windows 10 Device During the Out of Box Experience – OOBE
If you perform an in-place upgrade from a previous version of Windows 10, Windows 8, or Windows 7, you won’t see the new OOBE. Instead, you will see a promotional screen informing you about key universal apps such as Microsoft Edge (web browsing), Photos (images), Movies & TV (video), and Groove (music).
For users setting up a new PC or performing a clean install, you will be greeted by a new, simplified, tabbed interface broken down into four categories: Basics, Network, Account, and Services. You are first welcomed by Microsoft’s digital assistant, Cortana, which accepts voice commands and guides you through the setup process.
Help from Cortana is optional, of course, and you can disable the digital assistant by clicking the microphone icon in the lower left-hand bottom. Additional options are also available for adjusting the volume if needed. I must admit, the new interface looks a bit like a PowerPoint presentation—not that there is anything wrong with that.
The first screen, called Basics, lets you choose your language and keyboard. You can also select a different keyboard layout if you live in a different region.
The next screen focuses on connecting to a network. This option will only be available if there is an active connection. If not, click Skip for now. If there is a wireless network, you would like to connect to, select it, click Connect, then enter the password.
Users who might be on a metered connection would like to avoid depleting their mobile data, click Properties, and then toggle the On button under Metered Connection. Windows 10 setup will use the opportunity to install last-minute updates, so you don’t want to arrive at the desktop without any mobile remaining.
Account Settings
Now we arrive at an important screen: Account. Here you must set up a user name for signing in to the computer and managing its resources. Windows 10 offers two methods of signing in: a local account and a Microsoft account. Windows 10 setup only provides the option to set up a Microsoft Account if you are connected to the Internet. If you are not connected to one, the setup will default to a local account.
Local Account – this account works like credentials used to log onto Windows 7 and earlier versions of Windows. A local account doesn’t include the modern benefits of Windows 10, such as PC Syncing, the ability to download apps from the Windows Store, and two-factor authentication. A local account also requires setting up a hint in case you forget your password.
Microsoft Account – this type of account uses a Microsoft email address linked with your Microsoft account. Normally, this email address would use the or domains. You can set up Windows 10 with a or address; ensure that your email address is associated with a Microsoft account.
A Microsoft Account includes the benefits of keeping files and settings, such as themes, passwords, and apps synced across devices running Windows 10. A Microsoft Account also includes support for two-factor authentication, which prevents hackers from easily accessing your computer. Users can also access services such as Find My Device in case your device gets lost or stolen. The Microsoft Account is also required to download Universal apps from the Windows Store. Reactivation is also easier if you reinstall Windows 10 or transfer your license to another computer.
So, the benefits of the Microsoft Account are significantly advantageous. Whichever option you decide, make sure it’s secure—don’t use names, places, or birthdays as your password. Check out our article for tips about creating a strong password if you need some ideas. One of the common mishaps when setting up your computer for the first time is forgetting the password you created. You can write it down on a piece of paper during setup, memorize it, then destroy it.
Setting up with a Microsoft Account
If you have an active Internet connection, Windows 10 setup offers the option to sign in with your Microsoft Account. Let’s perform a quick run-through to see what that’s like. The first screen asks you to enter your Microsoft ID. If you have an or email address, use that, since you probably already have a Microsoft account. Otherwise, click Create account to set one up.
Enter your password, then click Next.
Microsoft accounts configured with 2FA will need to enter a security code for your protection. The Microsoft Authenticator app makes this convenient if you already have it installed on your iOS or Android device. If you don’t have the Authenticator app, you can choose another method. For instance, Microsoft can call your phone, then ask you to press the pound sign to confirm, then hang up.
An extra sign-in method offered is a PIN, which uses four numbers for authentication. You can always set this up later from within Start > Settings > Accounts > Sign in options.
We now arrive at the Services screen; this is where you get to enable Cortana and adjust privacy settings. Cortana is a major part of Windows 10; it’s not required but definitely differentiates the operating system from previous releases. If you choose to enable Cortana, you can activate her by saying, ‘Hey Cortana.’ Cortana will respond to your every command, such as checking the weather, scheduling a reminder, finding the name of a song, adjusting the volume, or telling a joke.
Privacy Settings
The privacy screen presents a list of default options selected. Some of these are essential for making your Windows 10 experience even better. For instance, Location can help Cortana tell you directions. Diagnostics can be an important part of helping to improve the apps you use in Windows 10. Some settings can be turned off, such as relevant ads and tailored experiences. If you want more details about each, click the Learn more button. When you are ready, click Accept.
Windows 10 will then confirm your settings then perform a few last-minute chores such as checking Windows Update and the Windows Store for the latest updates.
After arriving at the desktop, you can start using Windows 10. You can make further adjustments to your privacy settings by opening Start > Settings > Privacy.
If you are using Windows 10 for the first time, check out our tutorial to learn about the different parts of the interface. Also, check out our post-setup article for additional things you can do after completing the installation.
Have a question about the OOBE? Leave a comment below, and we’ll look into it.
How to enable Remote Desktop on Windows 10
On Windows 10, you can enable Remote Desktop to allow remote access to a computer using the Remote Desktop Protocol (RDP). Usually, you would use this feature to offer assistance or control a device or server without being physically present at the location using the modern “Remote Desktop” or legacy “Remote Desktop Connection” app.
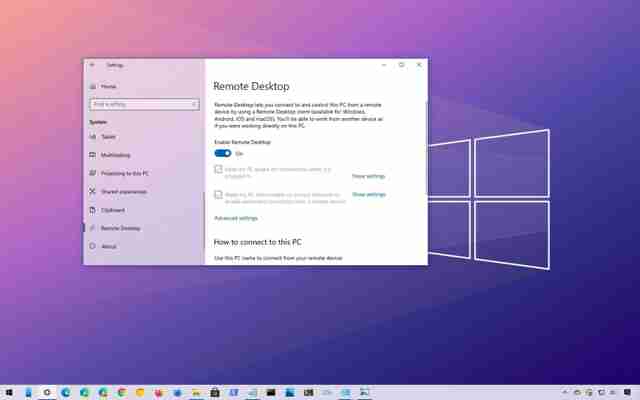
The ability to allow external access to a device has been available for many years, but it was a feature you have to configure using the Control Panel. However, on Windows 10, the settings to enable remote access are now included in the Settings app.
In this guide, you will learn the steps to enable Remote Desktop to manage a device or access your files and apps remotely using the Settings app as well as using Control Panel on Windows 10.
Important: Remote Desktop is not a feature available on Windows 10 Home, only on Windows 10 Pro and Enterprise. If you’re running Windows 10 Home, you can use the Remote Desktop isa feature available on, only on Windows 10 Pro and Enterprise. If you’re running Windows 10 Home, you can use the Chrome Remote Desktop as an alternative
Enable Remote Desktop on Windows 10 using Settings
To enable Remote Desktop on Windows 10 using the Settings app, use these steps:
Open Settings on Windows 10. Click on System. Click on Remote Desktop. Turn on the Enable Remote Desktop toggle switch. Click the Confirm button.
Once you complete the steps, you can connect to the computer using the modern Remote Desktop app (recommended) or the Remote Desktop Connection app included with Windows 10.
You’ll also notice two new additional options to ensure you can always connect when you’re away, including “Keep my PC awake for connection when it is plugged in” and “Make my PC discoverable on private networks to enable automatic connection from a remote device.”
In the “Advanced settings” page, you’ll also find additional options, such as the ability to require computers to use “Network Level Authentication” to connect. This feature makes the connection more secure by requiring users to authenticate with the network before they can connect to the device.
The settings page also displays the current Remote Desktop port if you need to configure a router to allow remote connections outside the network. If nothing changes on your device, the port number should always be 3389.
Enable Remote Desktop on Windows 10 using Control Panel
Although the Settings app makes it easy to allow remote access to your computer, it’s still possible to enable RDP using Control Panel.
To enable Remote Desktop with Control Panel, use these steps:
Open Control Panel. Click on System and Security. Under the “System” section, click the Allow remote access link. Under the “Remote Desktop” section, select the Allow remote connections to this computer option. Click the Apply button. Click the OK button.
After you complete the steps, you can use one of the available clients from another computer to connect to your device remotely.
It should be noted that as you enable the feature using Control Panel, the option to require Network Level Authentication also gets selected by default, which is an option you want to have enabled anyway.
While you can use Control Panel to configure Remote Desktop on Windows 10 and previous versions, such as Windows 8.1 and Windows 7, the ability to turn on the feature using the Settings app is only available starting on Windows 10.


